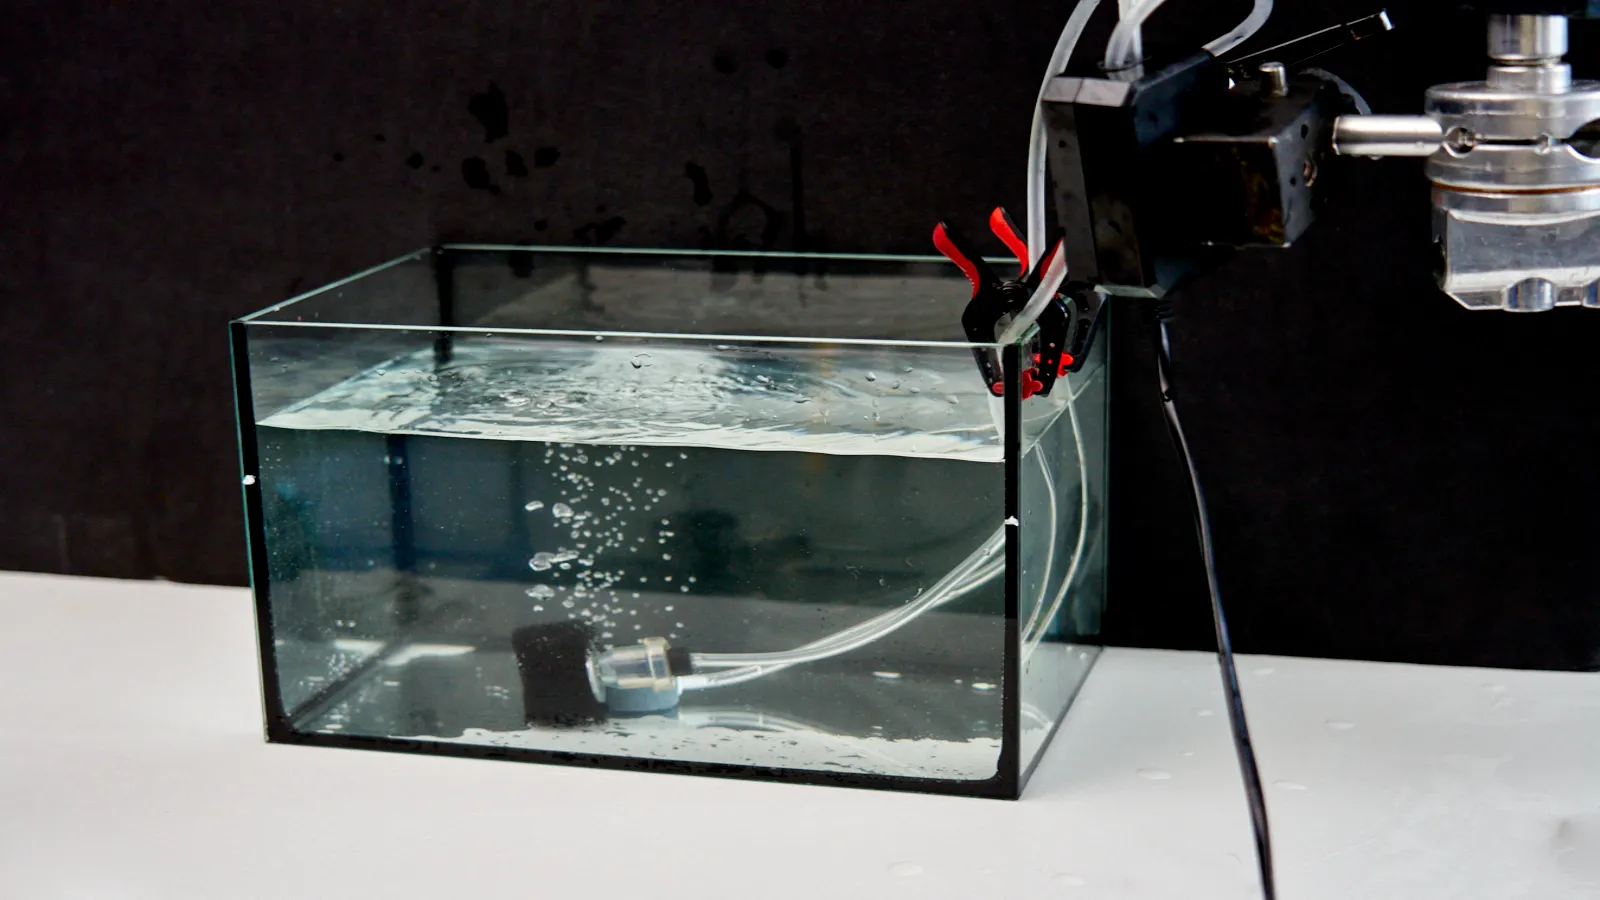
A tabletop bubble rig is one of the cheapest water rigs you can build, but it can create some of the most useful effects in food and beverage video. Background bubbles, fake boiling, underwater movement, liquid texture and product atmosphere can all come from a very simple setup.
You do not need a compressor. You do not need motion control. You do not need a complex custom tank.
For many first tests, you only need an aquarium pump, clear tubing and an air stone.
That is why bubble rigs are a good starting point for water rigging. They teach you how small air movement changes the look of liquid on camera, without forcing you to build a large splash system immediately.
Tabletop bubble rig basics
A bubble rig pushes air through water. The air exits through a stone, tube, drilled hole pattern or custom bubble source. As the air rises, it creates visible movement in the liquid.
That movement can be subtle or dramatic.
Small fine bubbles can create atmosphere behind a product. Large irregular bubbles can make cold water look like it is boiling. A hidden bubble source can add life to a glass, tank, bottle or cooking setup.
The basic system is simple:
- air pump
- clear tubing
- air stone or bubble source
- water container, aquarium, pot or glass
- clamps or weights to hold the bubble source in position
The important part is not the cost of the parts. The important part is placement, bubble size and control.
Why bubble rigs are useful for beginners
Bubble rigs are forgiving compared with splash rigs.
A splash rig often needs exact timing, pressure, angle and cleanup. A bubble rig lets you test slowly. You can move the stone, change the depth, adjust the pump strength, change the background and watch the result live before filming.
This makes it a strong beginner tool.
You can learn how water reacts to light, how bubbles look in slow motion, how reflections change through glass, and how small changes in placement affect the shot.
A bubble rig is also reusable. The same pump and tubing can be used in aquariums, bowls, glasses, cooking pots and small tanks.
1. Aquarium pump: the simplest air source
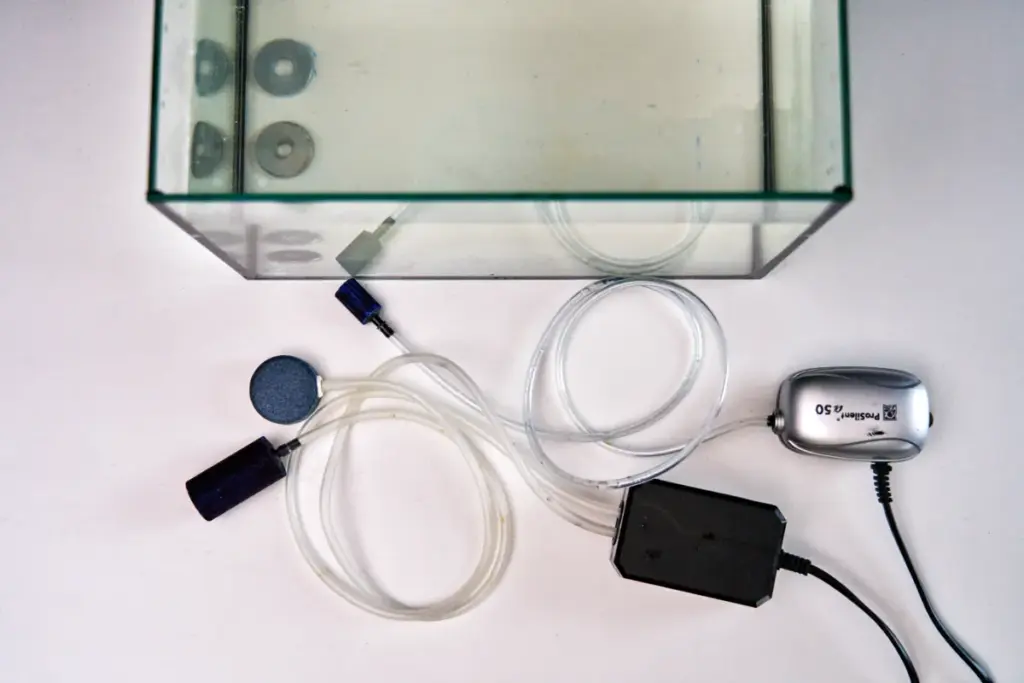
The easiest air source is a small aquarium pump.
Aquarium pumps are designed to push air continuously through tubing and air stones. They are cheap, quiet enough for most visual work and easy to find in pet shops or online.
For tabletop filming, you usually do not need a large pump at the beginning. A small single-outlet or dual-outlet aquarium pump is enough for many tests.
Single-outlet pump
A single-outlet pump is good for one air stone or one bubble source. It is simple and easy to control.
Use it for:
- one glass
- one small aquarium
- one fake boiling point
- one background bubble source
Dual-outlet pump
A dual-outlet pump gives you two separate air lines. This is useful when you want bubbles from two positions or when you want to combine different bubble sizes.
For example, one line can feed a fine air stone, while the second line feeds a larger custom bubble source. The result can look more natural than one perfectly uniform bubble pattern.
2. Air stones and bubble size
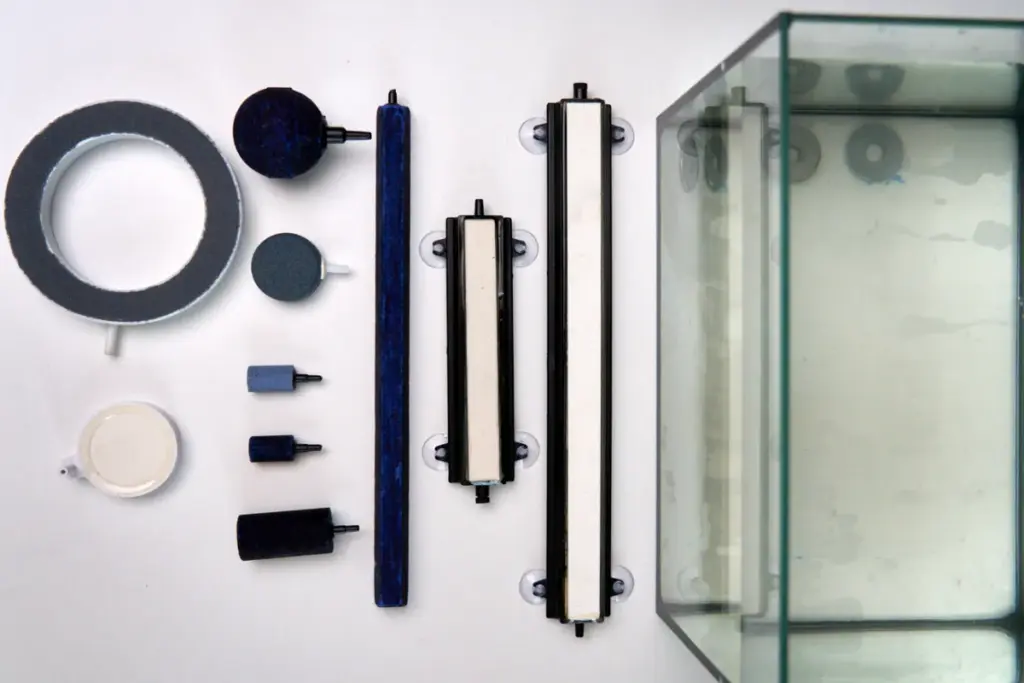
The air stone controls the shape and size of the bubbles.
Fine air stones create many small bubbles. These are useful for background atmosphere, underwater product shots and subtle movement in clear liquids.
Larger stones or custom drilled tubes create bigger, more irregular bubbles. These are better for fake boiling or stronger visual movement.
This is where testing matters. Two air stones that look almost identical can behave differently in water. Some create a soft mist of bubbles. Others create uneven streams. Some float, some stay down, and some need extra weight to stay in place.
Useful bubble sources to test
- small round air stone
- long rectangular air stone
- flexible bubble wall
- tube with small drilled holes
- custom 3D printed bubble box
- sponge or porous material for softer bubbles
Do not assume one bubble source solves every shot. Keep two or three different options in your water rig kit.
3. Fake boiling without heat
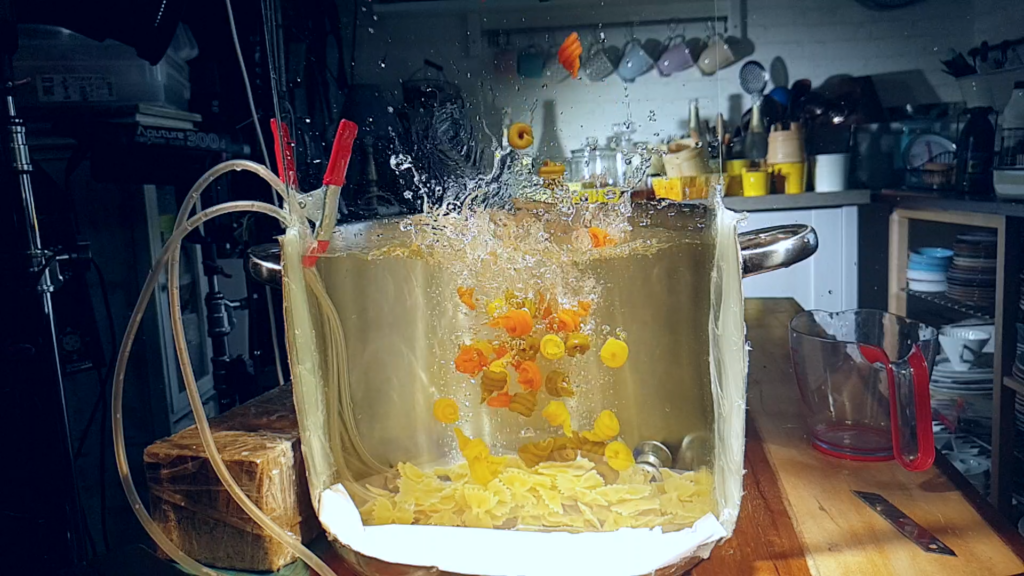
Fake boiling is one of the most practical uses for a tabletop bubble rig.
Instead of heating water, you place an air source under the surface. The bubbles rise and break at the top, creating the look of boiling water for the camera.
This is useful because real boiling creates problems. It produces steam, fogs glass, overcooks food, makes the pot harder to handle and shortens the working time. Real heat can also make a small tabletop set more difficult to manage.
With fake boiling, the water can stay cold or room temperature.
You can place pasta, vegetables, dumplings or other food inside the pot and keep them visually stable for much longer. The camera sees movement, but the food is not being destroyed by heat during every take.
How to make fake boiling look better
- hide the air stone under the food or behind the pot edge
- use more than one bubble source for irregular movement
- mix small and larger bubbles
- keep the water level realistic
- avoid bubbles that look too uniform or too aquarium-like
- shoot from an angle where the source is not visible
The goal is not to create perfect aquarium bubbles. The goal is to create believable cooking movement.
4. Background bubbles for product shots
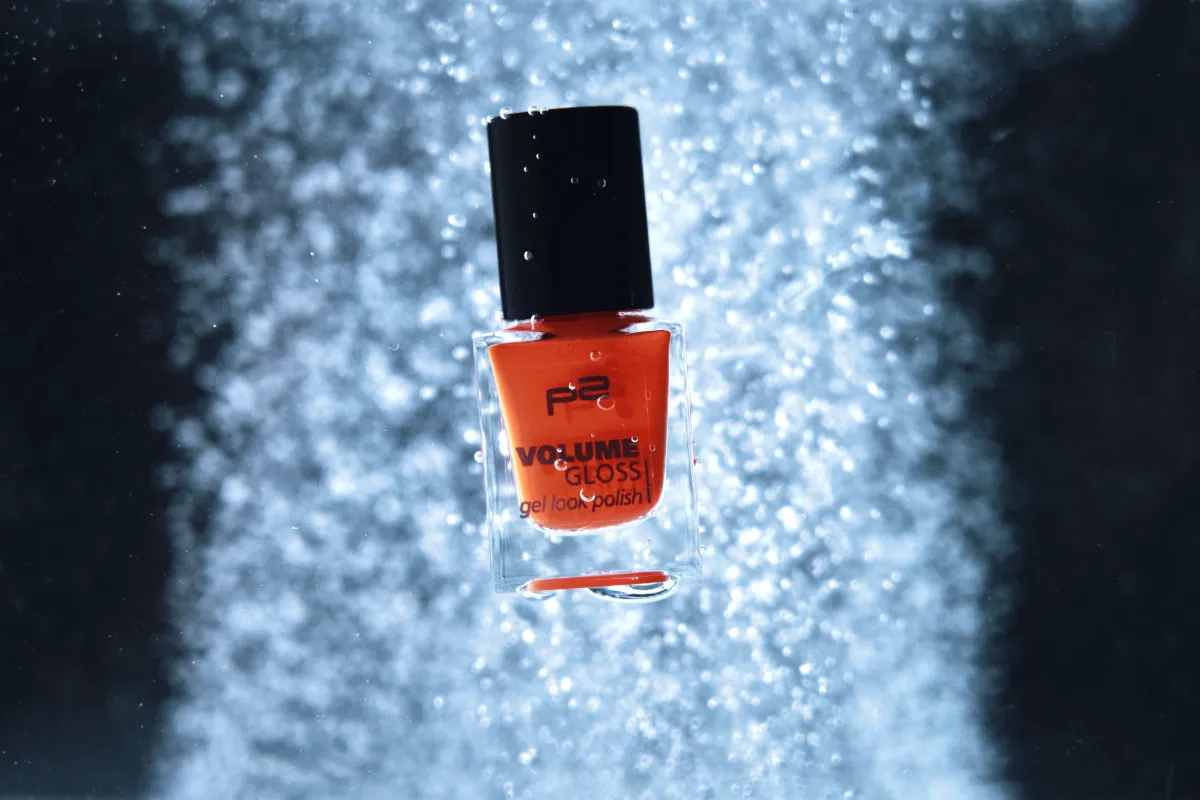
Bubble rigs are also useful in underwater product shots.
A product sitting in still water can look dead on camera. Add a small bubble source behind it, and the shot immediately has more depth and motion.
The bubbles do not always need to touch the product. Often, they look better in the background, slightly out of focus, rising behind the hero object.
This works well for:
- cosmetic products in water
- fruit inside a tank
- bottles or cans in a cold liquid environment
- beverage ingredients
- clean beauty-style shots
Use a flat-front aquarium when you want clean optics. Curved glass can distort the bubbles and the product, which can be either useful or distracting depending on the shot.
5. Bubble texture in glasses and drinks
A bubble rig can also add texture inside a glass.
This is useful when natural carbonation is not strong enough, or when it disappears too quickly under studio lights.
In slow motion, real bubbles may not last long enough for repeated takes. A hidden tube or small air source can keep movement alive inside the drink.
But this needs to be done carefully. If the bubbles are too large or too regular, the drink can look fake. If the tube is visible, the illusion is broken.
For glasses, use the smallest practical air source and hide the tube behind the glass, behind ice, behind garnish or on the far side from camera.
Always test how the bubbles look with the actual lens and camera angle. A tube that is invisible from one angle can become obvious when the camera moves slightly.
6. Controlling bubble strength
Most small aquarium pumps run continuously, so control comes from airflow restriction and placement.
You can use a small inline valve or clamp on the air tube to reduce the air volume. This gives you more control over bubble intensity.
Do not rely only on turning the pump on and off. A better setup lets you fine-tune the flow while watching the shot.
Useful control methods include:
- inline air valve
- small tube clamp
- splitting one pump into two lines
- using different air stones
- changing the depth of the bubble source
- moving the source farther from the product
Depth matters. A bubble source placed deeper in the tank gives bubbles more time to expand, drift and separate before they reach the surface. A source close to the surface creates shorter, more direct bubbling.
7. Keeping the bubble source in place
A common beginner problem is that the air stone moves.
It floats, twists, slides across the bottom or changes angle between takes. That changes the bubble pattern and makes the shot less repeatable.
Fix the bubble source before filming.
You can use:
- small weights
- suction cups
- wire holders
- hidden clamps
- 3D printed brackets
- tape outside the container to guide the tube
Do not let the tube pull the air stone out of position. Route the tube cleanly and give it enough slack so it does not drag the source when the set moves.
Repeatability is the difference between a test and a usable rig.
8. Common bubble rig mistakes
Using bubbles that are too perfect
Real boiling and natural liquid movement are not perfectly even. If the bubbles are too uniform, the shot can look like an aquarium instead of a food scene.
Putting the air stone in the wrong place
If the bubble source is visible or too close to the product, it can distract from the shot. Hide it behind food, behind the product, or outside the main focus area.
Using too much air
More bubbles do not always look better. Too much air can create chaos, obscure the product or make the liquid look artificial.
Forgetting water safety
Even a small bubble rig uses water near cables, lights and gear. Keep power supplies, controllers and extension cables away from the wet side of the set. For frequent water work, it is smart to understand basic electrical protection such as residual-current devices.
Not testing with the final container
Bubbles look different in a glass, aquarium, pot or bottle. The shape of the container changes the image. Always test in the actual container before the final shot.
9. A simple starter parts list
A beginner tabletop bubble rig can be built with very few parts.
- small aquarium air pump
- clear air tubing
- one fine air stone
- one larger bubble source
- inline air valve or clamp
- suction cups or small weights
- small aquarium, glass or pot for testing
- towels and plastic table protection
- basic clamps or holders
This is enough to test fake boiling, background bubbles and simple liquid texture.
Later, you can add custom drilled tubes, 3D printed bubble boxes, stronger pumps or multiple air lines. But the first goal is to understand how bubble size and placement change the shot.
10. Testing workflow
Start with plain water and a simple container.
Place the bubble source at the bottom. Turn on the pump. Watch the bubble size, direction and strength. Move the source. Change the depth. Add a clamp or valve. Test again.
Then place a product, food item or object in the water. Watch whether the bubbles support the subject or distract from it.
Finally, test with the real camera angle and lighting.
Do not judge the rig only by looking at it from above. Water rigs must be judged through the camera. Glass reflections, lens angle, background brightness and focus distance all change the result.
FAQ
Do I need a compressor for a bubble rig?
No. For small bubbles, an aquarium pump is usually better. A compressor is too aggressive for many subtle bubble effects and needs more control to avoid overpowering the shot.
Can I use this for fake boiling?
Yes. Fake boiling is one of the best uses for a bubble rig. Use one or more bubble sources under the food or near the bottom of the pot to create surface movement without heat.
Why do my bubbles look too artificial?
The source may be too uniform, too strong or too visible. Try mixing different bubble sizes, reducing airflow, hiding the source better or changing the camera angle.
Can I use bubbles in drinks?
Yes, but carefully. Use a small hidden tube or fine bubble source, and test with the actual glass and lens angle. Too much air can make the drink look fake.
What is the cheapest setup to start?
A small aquarium pump, clear tubing and one or two air stones are enough to start. Add an inline valve or clamp for better control.
Where to go from here
If you are new to water rigs, start with the guide on where to start with tabletop water rigs.
For the bigger picture, read what tabletop rigging is and how water rigs connect to air and motion-control setups.
You can also see real tabletop rigging examples in the Rig Lab Academy work section.
The course covers bubble rigs in Module 2, including aquarium pumps, air stones, custom bubble makers, fake boiling setups and practical testing workflows for food and beverage shots. The waitlist is open.
A tabletop bubble rig is simple, cheap and extremely useful. Start with a small pump, control the bubble source, test through the camera, and use the effect only where it supports the shot.