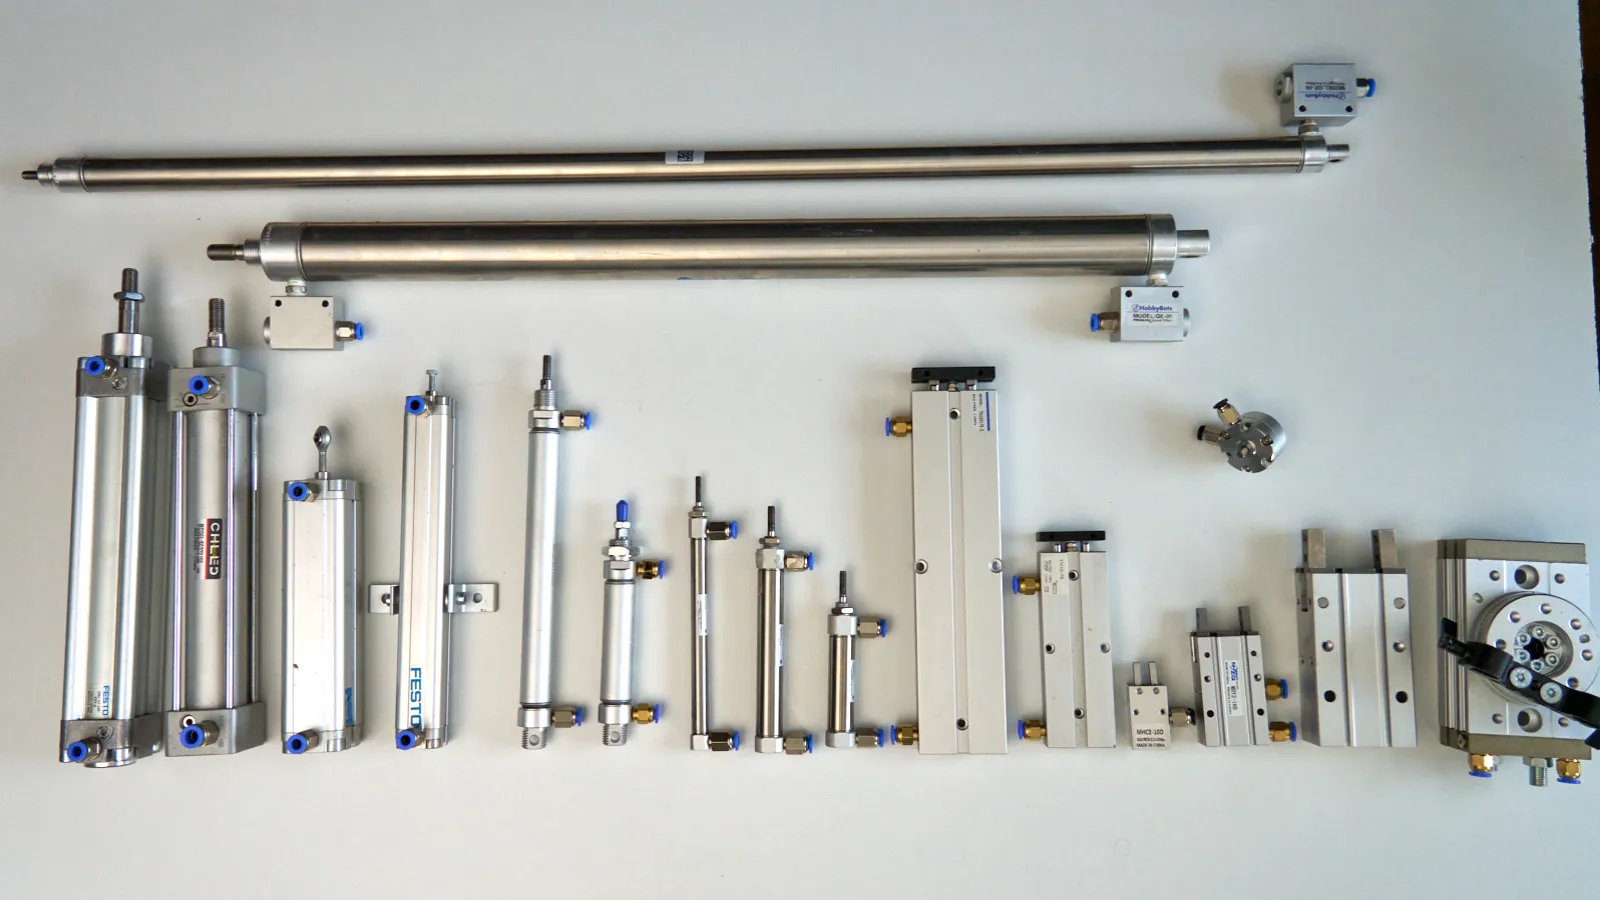
Choosing a pneumatic cylinder for filmmaking can feel confusing the first time you search for one. You see bore, stroke, single-rod, double-rod, compact cylinders, magnetic sensors, ISO standards, port sizes, mounting brackets and model codes that all look important.
But for tabletop food video and slow-motion rigging, the first choice is much simpler than it looks.
You do not need to understand every industrial automation specification before building your first rig. You need to understand the few numbers that actually affect your shot: how much force the cylinder has, how far it moves, and what kind of movement it creates.
Once you understand those basics, choosing a cylinder becomes much less random.
How to choose a pneumatic cylinder for filmmaking

A pneumatic cylinder turns compressed air into movement. In tabletop rigging, that movement can pull a slide plate, push a syringe, release a trigger, lift a small object, or launch a lightweight ingredient into frame.
The cylinder is not the whole rig. It is only one part of the system. You still need a compressor or air source, pressure regulator, solenoid valve, hose, fittings, a trigger, and a stable way to mount everything.
But the cylinder is the part that creates the physical action. If the cylinder is too weak, the rig does not move properly. If it is too strong, the rig shakes, breaks parts, or becomes difficult to control.
For most beginner tabletop rigs, you only need to focus on three things first:
- bore
- stroke
- rod style
Get those three right and you will have a cylinder that works across many small rigs.
1. Bore: how much force the cylinder has
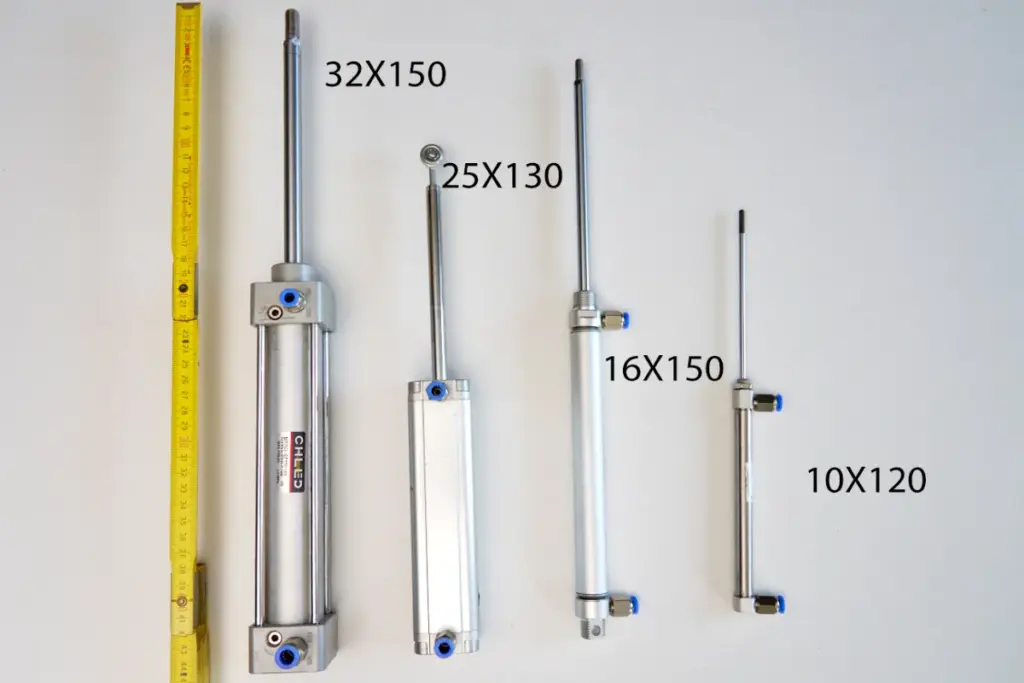
Bore is the diameter of the piston inside the cylinder. It is usually measured in millimeters.
A 16 mm bore cylinder is still small, but very useful for tabletop work. A 25 mm bore cylinder is noticeably stronger. A 40 mm or 63 mm cylinder is already large for many food video setups.
The important thing to understand is that bigger bore means more force. The force comes from air pressure pushing against the piston area. When the bore gets bigger, the piston area grows quickly, and the cylinder becomes much stronger.
For most tabletop rigs, you will usually work in the 16 mm to 32 mm range.
A 20 mm bore is a very good first choice. It has enough force to move a slide plate, push a small mechanism, or drive many simple tabletop actions. At the same time, it is not so strong that it shakes the whole set every time it fires.
When 16 mm bore is enough
- pneumatic slide drop rigs
- small food release mechanisms
- lightweight launcher tests
- small syringe push setups
- simple push or pull actions
When to move up to 20 mm or 25 mm
- the plate is heavy
- the food is sticky and creates more friction
- you are pushing a large syringe full of liquid
- you are building a stronger launcher
- you need more acceleration on a heavier moving part
Do not start with a very large bore cylinder just because it looks more powerful. In tabletop work, too much force can be worse than too little. A strong cylinder can shake the rig, move the table, loosen brackets, crack 3D printed parts, or make the motion look violent instead of controlled.
Start smaller. Add more force only when the shot actually needs it.
2. Stroke: how far the cylinder moves
Stroke is the travel distance of the cylinder rod. A 100 mm stroke cylinder moves 100 mm. A 200 mm stroke cylinder moves 200 mm.
This number matters because it defines how much movement you can create.
For tabletop rigs, 200 mm stroke is often the most useful first size. It gives you enough movement for a slide drop rig, a launcher-style test, or a longer push action, while still being small enough to mount on a tabletop setup.
A common beginner mistake is buying a cylinder that fits only one specific rig. For example, a 50 mm stroke cylinder may work for a tiny trigger, but it will not give you enough travel for a slide plate or launcher test later.
A 200 mm stroke cylinder gives you flexibility. You do not always have to use the full travel. You can limit the motion mechanically, adjust the mounting, or only use part of the stroke.
When to use shorter stroke
- the rig must fit into a very tight space
- the movement is very small and precise
- you are pushing a syringe only a few centimeters
- you want less rod movement for safety or stability
When to use longer stroke
- you need a longer slide movement
- you are building a launcher-style rig
- you need more travel for adjustment
- the rig has enough space to mount a longer cylinder safely
For a first air rigging kit, both 16×200 mm and 20×200 mm cylinders are practical starting points. A 16×200 mm cylinder has a 16 mm bore and 200 mm stroke, while a 20×200 mm cylinder has a 20 mm bore and the same 200 mm stroke.
3. Rod style: what kind of movement you need
The rod style defines how the cylinder moves and how it can be mounted into a rig.
For most beginner tabletop work, a standard single-rod cylinder is enough.
Single-rod cylinder
This is the most common and useful type. One rod extends and retracts from one side of the cylinder.
Use it for slide drops, syringe pushes, simple launchers, release mechanisms and many small push-pull rigs.
Double-rod cylinder
A double-rod cylinder has a rod extending from both sides. It can be useful for more balanced or symmetrical motion, but it is rarely the first choice for tabletop food rigs.
Buy this only when you have a specific reason.
Compact cylinder
A compact cylinder gives you similar movement in a shorter body. It is useful when space is tight, but it can be more expensive and sometimes less convenient for general rig building.
For a first kit, standard cylinders are usually easier.
Rotary cylinder
A rotary cylinder creates rotation instead of straight-line movement. These are useful for special launcher rigs, rotating cups, or ingredient collision setups where two small cups fire toward each other.
Rotary cylinders are powerful tools, but they are not the best first cylinder. Start with a linear cylinder first, then buy rotary when the rig design needs it.
Why 16×200 mm and 20×200 mm are smart first cylinders
If you are not sure what to buy first, both 16×200 mm and 20×200 mm double-acting pneumatic cylinders are practical starting points.
A 16×200 mm cylinder means:
- 16 mm bore
- 200 mm stroke
- linear rod movement
- usually double-acting
A 20×200 mm cylinder means:
- 20 mm bore
- 200 mm stroke
- linear rod movement
- usually double-acting
Both sizes work well for beginner tabletop rigs. The 16×200 mm version is lighter and provides enough force for many simple actions. The 20×200 mm version provides more force and additional headroom for heavier moving parts or rigs with more resistance.
You can use either size for:
- a pneumatic slide drop rig
- a small release mechanism
- a syringe splash test
- a light launcher setup
- a push or pull trigger
- general tabletop movement tests
It also fits well with common 20×20 mm aluminium profile structures, 3D printed brackets and small tabletop frames.
When you are building your first few rigs, reusable parts matter.A 16×200 mm or 20×200 mm cylinder is not just for one shot. Either size can become part of your basic reusable air rigging system.
Double-acting or single-acting?
Most cylinders you will use for tabletop rigging should be double-acting.
A single-acting cylinder uses air to move in one direction and a spring to return. A double-acting cylinder uses air in both directions. That gives you more control and more reliable return movement.
For tabletop rigs, double-acting cylinders are usually the better choice because you can control both the extend and retract movement through the solenoid valve.
If you are buying your first 16×200 mm or 20×200 mm cylinder, choose a double-acting version unless you have a very specific reason not to.
Solenoid valves: 5/2, 3/2 and 5/3
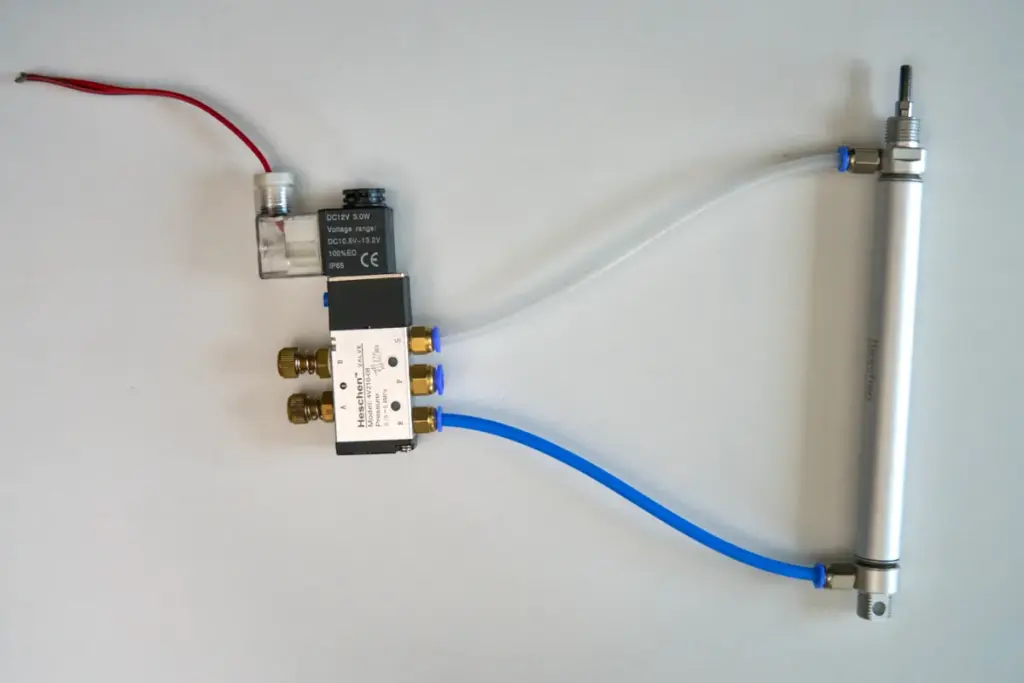
The solenoid valve controls where the compressed air goes. It tells the cylinder when to extend and retract.
For beginners, the safest default choice is usually a 5/2 solenoid valve.
5/2 solenoid valve
A 5/2 valve has five ports and two positions. It is very common for double-acting cylinders and works well for most beginner air rigs.
This is the one I would choose first.
3/2 solenoid valve
A 3/2 valve is usually used for single-acting setups. It can work, but it is more limited for general rigging.
Avoid it as your first valve unless you know exactly why you need it.
5/3 solenoid valve
A 5/3 valve has a center position and is more specialized. It can hold or stop the cylinder depending on the valve type, but it is not needed for most first rigs.
For a beginner tabletop rigging kit, choose a 5/2 valve and keep the system simple.
12 V or 24 V?
Solenoid valves are commonly available in 12 V and 24 V versions.
Both can work. The important thing is to choose one voltage and standardize your system around it.
If you buy one 12 V valve, one 24 V valve, random power supplies and different connectors, your rigging box becomes confusing very quickly. You will waste time checking what works with what.
For a small beginner system, 12 V is easy because many small power supplies, buttons, relays and controllers are available. For more industrial-style setups, 24 V is also common and reliable.
The exact choice matters less than consistency.
Pick one voltage for your solenoids and label everything clearly.
Hose size and fittings
Most small tabletop cylinders work well with 6 mm pneumatic hose.
For 16 mm and 20 mm cylinders, 6 mm hose and matching push-fit fittings are usually enough. Larger cylinders may use 8 mm hose, but you do not need to start there.
Use matching fittings for the cylinder ports, the solenoid valve and the hose size. Many problems come from mixing fittings, thread types and hose sizes without checking compatibility.
For a beginner kit, standardize around one hose size where possible. Keep spare fittings, elbows, straight connectors and T-connectors in the same size.
This makes building new rigs much faster.
Compressor and pressure regulator
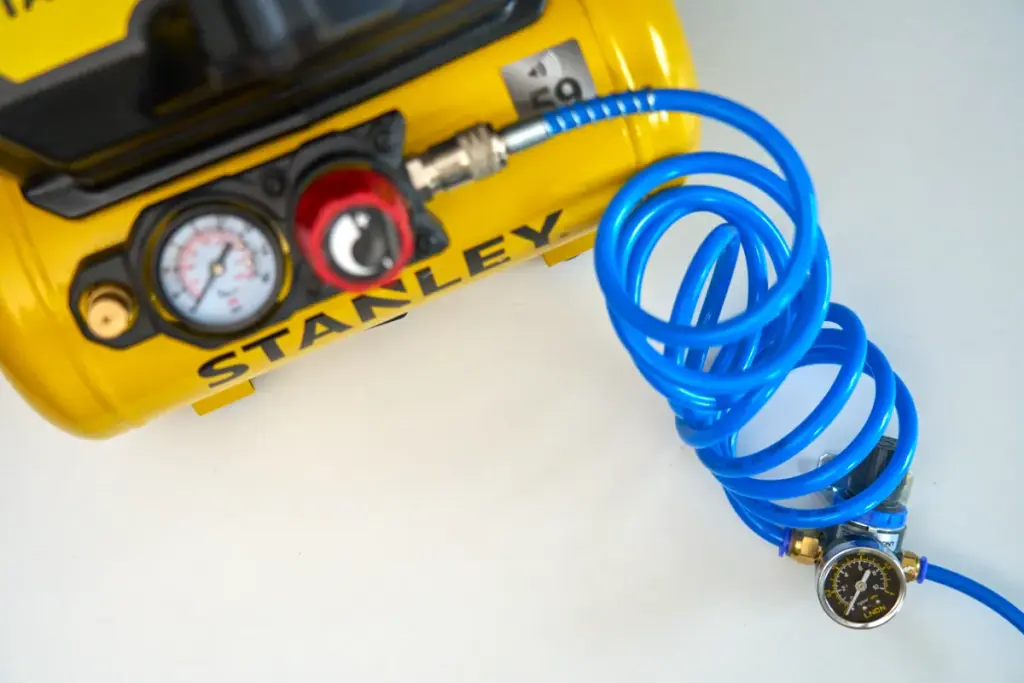
The cylinder needs compressed air. That usually comes from a small compressor with a tank.
For tabletop rigs, you do not need a huge industrial compressor. A small compressor can usually supply enough air for slide drops, small launchers and simple pneumatic triggers.
The more important part is the pressure regulator.
Always run the air through a regulator between the compressor and the solenoid valve. Many compressors can deliver more pressure than your tabletop rig needs. Without regulation, the cylinder can fire too hard, shake the rig or damage small printed parts.
Most simple tabletop pneumatic actions work somewhere around 3–6 bar, depending on the cylinder, friction, plate weight and rig design.
Start low. Increase pressure only when the movement is too weak.
Common beginner mistakes
Buying too much force
A larger bore cylinder looks safer because it seems more powerful. But in a small rig, too much force creates vibration and instability.
Buy enough force, not maximum force.
Buying too little stroke
A very short stroke cylinder can be useful, but it may only solve one small problem. If this is your first cylinder, a longer stroke gives you more room to learn.
Ignoring mounting
A cylinder is only useful if you can mount it correctly. Before buying unusual cylinder types, think about how you will attach the cylinder body and the rod end to the rig.
Mixing too many standards
Different hose sizes, voltages and connector types make the setup harder to maintain. Standardization saves time and money.
Skipping the pressure regulator
This is the most important mistake to avoid. A regulator is not optional. It gives you control and protects the rig.
Sourcing: budget, fast shipping or premium parts
You can buy pneumatic cylinders from different types of suppliers.
Budget marketplace cylinders are often good enough for beginner tabletop rigs. They are not under continuous factory load, and many simple food video rigs fire only a limited number of times per session.
Amazon-style sellers can be useful when you need faster shipping or easy returns, but prices are usually higher.
Industrial suppliers such as Festo or SMC offer higher-quality components, but they can be far more expensive. For daily commercial use, premium parts can make sense. For a beginner learning rigging, they are often more than you need.
For a first rig, buy one or two affordable 16×200 mm or 20×200 mm cylinders and learn with them. Once you know which rigs you actually use often, you can upgrade specific parts later.
FAQ
What is the best first pneumatic cylinder for tabletop rigs?
A standard double-acting 16×200 mm or 20×200 mm cylinder is a smart first choice for many tabletop rigs. The 16 mm bore version is lighter and provides enough force for many simple actions, while the 20 mm bore version gives you additional force and headroom for heavier mechanisms or higher-friction setups.
Is 16 mm bore enough?
Yes. That is one of the reasons 16×200 is useful. You can move it between a slide drop rig, syringe push setup, small launcher or general trigger mechanism.
Do I need magnetic sensors?
Usually not for beginner tabletop work. Magnetic sensors can tell a controller when the cylinder reaches a position, but most first rigs do not need that level of feedback.
Can I use the same cylinder for different rigs?
Yes. That is one of the reasons 16×200 is useful. You can move it between a slide drop rig, syringe push setup, small launcher or general trigger mechanism.
What if the cylinder leaks?
First check the fittings and hose connections. Small leaks often come from fittings that are not seated correctly. If the cylinder body itself leaks around the rod or piston, replacing the cylinder is usually easier than repairing it for beginner-level parts.
Where to go from here
If you are building your first air rig, the next step is to use this cylinder in a real setup. The pneumatic slide drop rig build guide shows how the cylinder, valve, hose and trigger work together in a practical food video rig.
For the bigger picture of air, water and motion-control systems, start with the guide on what tabletop rigging is.
The course goes deeper into pneumatic rigging, cylinder sizing, dual-cylinder setups, sourcing decisions and selected 3D files where available. The waitlist is open.
The best pneumatic cylinder for filmmaking is not the biggest one you can buy. It is the cylinder that gives your rig enough movement and enough force without making the setup harder to control.