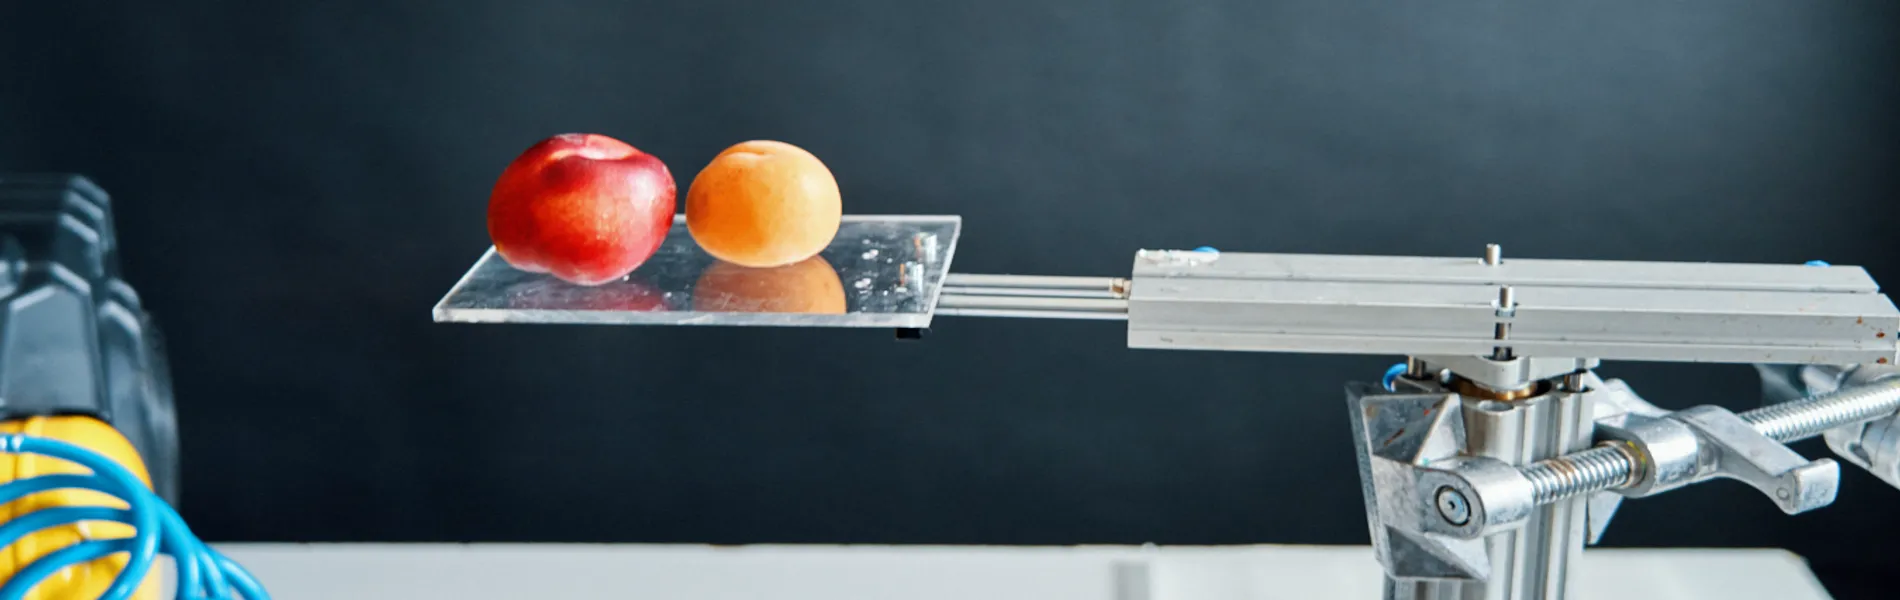
If you build one practical air rig first, build the pneumatic slide drop rig. It is not the most complex tabletop rig, and it is not the most dramatic one. But it teaches the basic logic behind many other rigs: hold something in position, trigger one controlled movement, and let the camera capture the result.
For food and beverage work, this rig solves one of the most common problems: dropping an ingredient into frame with repeatable timing.
A burger ingredient landing on a bun. Fruit dropping into a glass of liquid. Butter falling onto bread. Vegetables dropping into a pot. A small product falling cleanly into the exact same position again and again.
Doing this by hand can be frustrating. Hands shake. Throws vary. The position changes by a few centimeters every time. In slow motion, every small mistake becomes visible.
The pneumatic slide drop rig removes most of that randomness.
If you want to see the complete build before going deeper into the details, here is the full pneumatic drop rig build from start to finish.
How a pneumatic slide drop rig works
The idea is simple. Food sits on a small slide plate. The plate holds the food in position above the final landing area. When you press the trigger, a pneumatic cylinder pulls the plate away. The support disappears, and gravity does the rest.
The cylinder is not throwing the food. It is only removing the support.
This is an important difference. The food falls because gravity pulls it down, not because the cylinder pushes it. That is why the shot looks cleaner and more natural than a hand throw. The rig controls the timing and release point, while gravity creates the movement.
Once you understand this rig, many other pneumatic rigs become easier to understand. A launcher, syringe splash rig, impact trigger or release system all use the same basic logic: compressed air creates a repeatable mechanical action.
A note on safety before building
Pneumatic rigs use compressed air, and the cylinder rod can move quickly. Even small tabletop rigs should be tested carefully.
Always use a pressure regulator between the compressor and the solenoid valve. Do not connect the cylinder directly to the compressor output. Many small compressors can deliver around 8 bar, while most tabletop rigs only need around 3–5 bar. The regulator is one of the most important safety parts in the system.
When testing a new rig, keep your hands and face away from the path of the cylinder rod. Before pressing the button, know exactly which direction the rod will move and what it can hit.
Check all threaded rods, bolts, lock nuts and brackets before firing. A loose part can move or shake under pressure. Repeated firing can also loosen standard nuts, so lock nuts are strongly recommended.
If you use a compressor with a tank, follow the basic maintenance instructions for that compressor. Do not exceed its rated pressure, and drain condensation from the tank when needed.
What the rig does and does not do
The slide drop rig releases food into frame. It does not launch, push, throw or splash the food by itself.
This is why it is such a useful beginner rig. It separates two things that beginners often mix together: release and motion.
The cylinder controls the release. Gravity controls the fall.
The speed and look of the drop still depend on the object. A heavy strawberry falls differently from a lettuce leaf. A piece of cheese behaves differently from a dry cracker. A wet ingredient may stick to the plate, while a dry ingredient may release cleanly.
The rig cannot make every ingredient behave the same way. What it can do is give you the same release position and the same trigger timing for every take.
Single-cylinder version
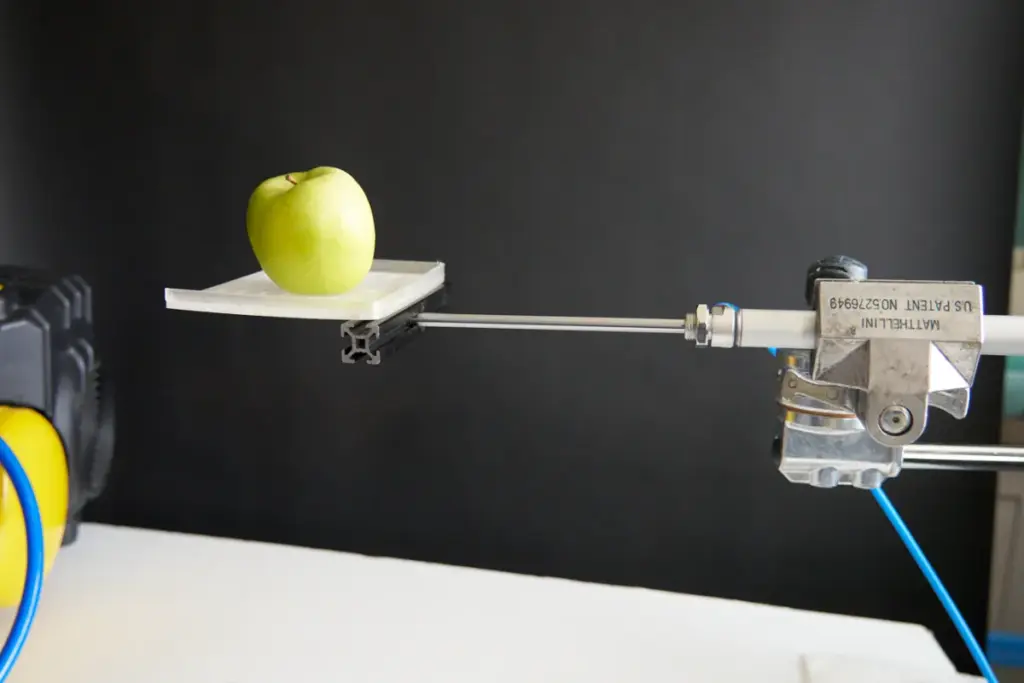
The simplest version uses one pneumatic cylinder. The cylinder pulls one slide plate sideways. The plate moves out from under the food, and the food drops.
This is the version beginners should build first.
It is simple, cheap and easy to understand. It shows you immediately how friction, pressure, plate surface and plate travel affect the shot.
The main problem with the single-cylinder version is sticking. Wet or soft food can drag slightly with the plate before falling. Butter, cheese, cut fruit and anything with moisture can move sideways for a moment instead of dropping straight down.
You can reduce this problem with a smoother plate surface, shorter plate travel, less contact area and better food preparation. But you cannot eliminate it completely with only one cylinder.
Dual-cylinder version
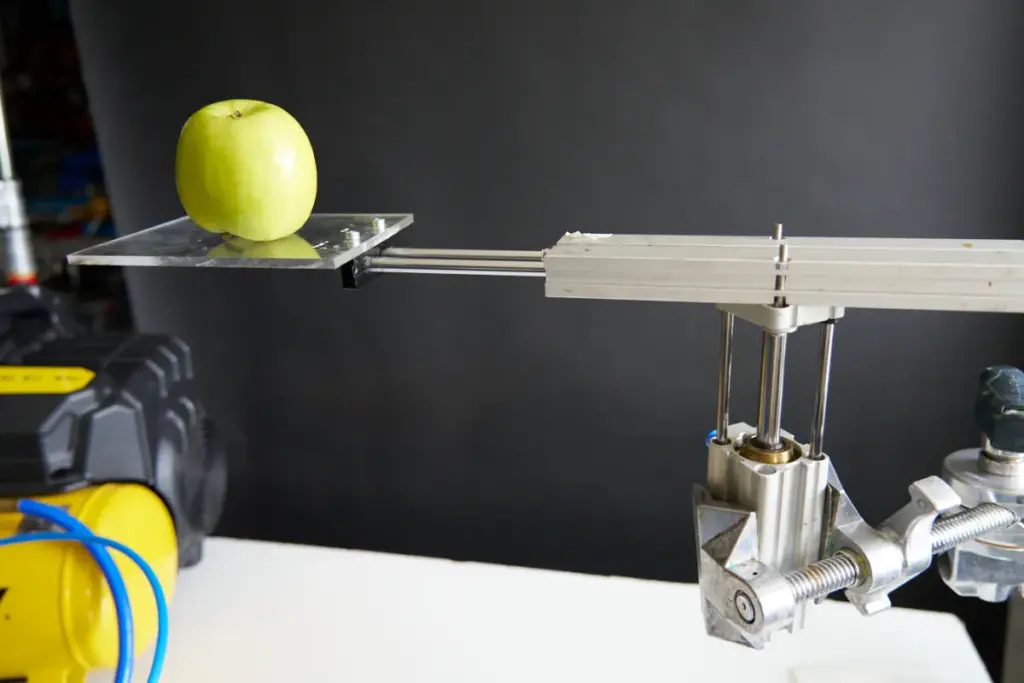
The dual-cylinder version solves the sticking problem more reliably.
In this setup, one cylinder pulls the lower slide plate away. A second cylinder or retaining piece helps separate the food from the plate at the moment of release. The idea is to stop the food from travelling sideways with the plate.
This is the more reliable version for paid work, especially when the ingredient is sticky, wet or irregular.
The timing is more controlled, and the release is cleaner. You can repeat the same drop with less variation between takes.
Still, it is better to build the single-cylinder version first. Once you feel the sticking problem yourself, the dual-cylinder upgrade makes much more sense.
Parts you actually need
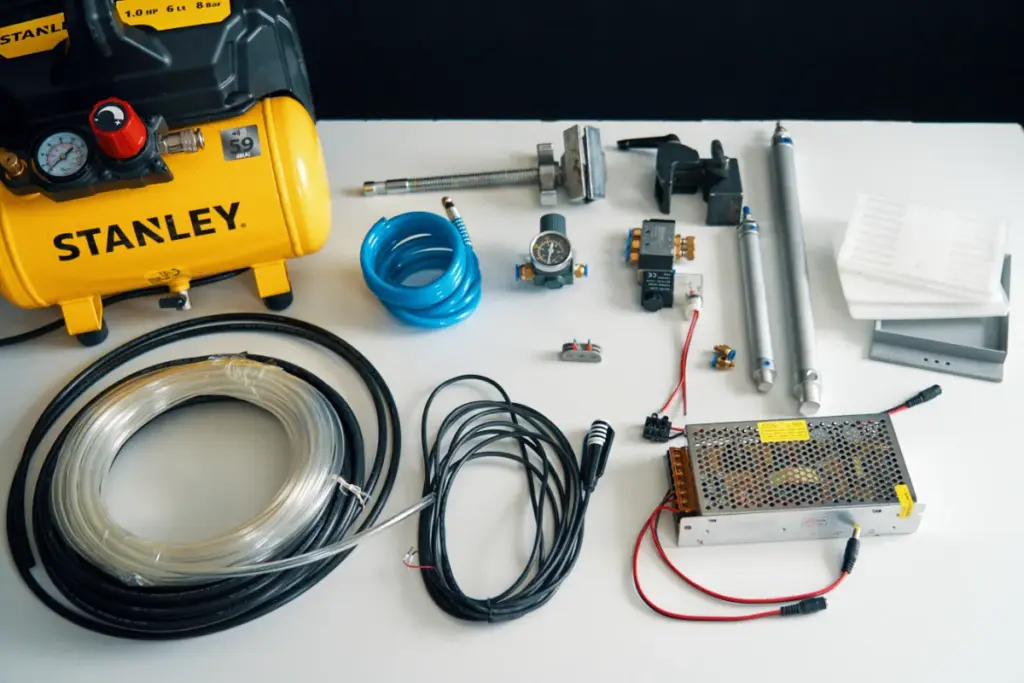
For a basic single-cylinder pneumatic slide drop rig, you need a small set of reusable air rigging parts.
- one pneumatic cylinder, for example 16mm bore and 200 mm stroke
- one 5/2 solenoid valve, usually 12 V or 24 V
- a small compressor or air source
- pressure regulator
- 6 mm pneumatic hose
- push-fit pneumatic fittings
- 12 V or 24 V power supply for the solenoid
- momentary push button or simple trigger box
- M6 threaded rods
- M6 lock nuts, washers and standard nuts
- 20×20 aluminium profile or another rigid frame material
- 3D printed slide plate or a smooth lightweight plate
- insulation tape or heat shrink to smooth exposed threaded rods
A 16×200 cylinder is a good first size because it is useful for more than one rig. You can use it for slide drops, small launchers, syringe-style pushes and other simple tabletop actions later.
The compressor is usually the most expensive part, but it carries over to almost every pneumatic rig you build after this.
Free STL Download
You can download the 3D-printable drop plate used in this pneumatic rig build.
The download includes the drop plate shown in this build and is intended for PLA printing.
Common build mistakes
A pneumatic slide drop rig is a simple way to make food drops more repeatable before moving into more complex pneumatic rigs.
Plate surface too rough
A rough 3D printed plate can catch food. Visible layer lines create friction, especially with wet or soft ingredients. Sand the surface or cover the top with a smoother food-safe surface for testing.
Threaded rods catching the food
Exposed threads can catch sticky food as the plate moves. Wrap the rods with insulation tape or smooth heat shrink where the food passes. This small change can improve many failed drops.
Too much pressure
Beginners often increase the regulator too much because they want a strong action. The cylinder fires violently, the rig shakes, and that vibration can move the set or show up in the footage.
Start low and increase only if needed. Many slide drop shots work around 3–4 bar, depending on the plate, cylinder and friction.
No pressure regulator
This is the mistake to avoid completely. Without a regulator, the cylinder may fire at full compressor pressure. That can be too aggressive for 3D printed parts, small brackets and delicate tabletop setups.
Plate travel too long
The plate does not need to travel 30 cm to release the food. It only needs to move far enough that the food no longer has support. Shorter travel often means cleaner release and less dragging.
No lock nuts
Repeated firing creates vibration. Standard nuts can loosen over time. Lock nuts keep the slide mechanism aligned for longer sessions.
How to test without wasting food
Do not test the rig first with hero food.
Start with a dummy object. Use plastic blocks, small wood pieces, foam, old product samples or cheap objects with similar weight and size. Fire the rig until it works ten times in a row.
After that, test with cheap food similar to the real ingredient. If the final shot uses avocado, test with a potato or another object with similar weight. If the final shot uses berries, test with cheaper fruit or small tomatoes.
Hero food should come out near the end, when the framing, lighting, focus and rig timing are already working.
Most wasted food happens because people test the entire setup with the best-looking ingredient too early. The rig is not ready, the lighting is not ready, the camera is not framed, and the first ten takes fail for reasons that have nothing to do with the food.
Use dummy objects first. Use cheap substitutes second. Use hero food last.
Five shots you can create with this rig
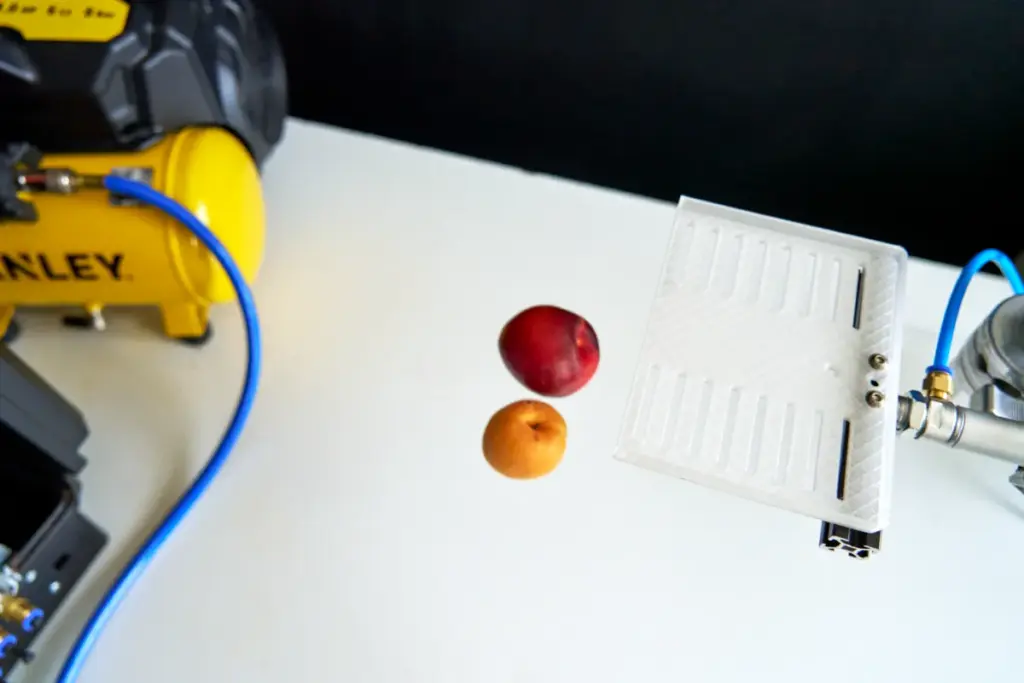
Once the pneumatic slide drop rig is reliable, you can use it for many portfolio shots.
Burger build-up
Drop ingredients one by one onto a bun. Lettuce, tomato, cheese, onion or sauce elements can all become separate slow-motion shots.
Fruit into milk
Drop a strawberry, blueberry or raspberry into a glass of milk. The splash, crown and rebound droplets become the main visual moment.
Egg into pan
A cracked egg can drop into a pan from a controlled position. With the right timing, the yolk and white separate beautifully in slow motion.
Cheese onto pasta
Shredded cheese falling onto pasta creates texture and movement. The strands spread in the air before landing.
Vegetables into a pot
Vegetables dropping into water, soup or a cooking setup can work well for food commercials and recipe-style visuals.
The rig stays the same. The shot changes because the food, landing surface, camera angle and lighting change.
FAQ
Can I use a smaller cylinder than 16×200?
Yes. A 16×100 or 16×150 cylinder can work for smaller plate movements. The reason 16×200 is useful as a first cylinder is flexibility. You can use the longer stroke for other rigs later.
Do I need a controller?
No. For one cylinder, a simple push button can trigger the solenoid. A controller becomes useful when you need several valves, motors or triggers to fire in sequence.
What compressor do I need?
A small compressor with a tank is enough for this kind of rig. The cylinder uses very little air per firing. For tabletop work, the important thing is stable regulated pressure, not a huge industrial compressor.
Can this work for cosmetics or product shots?
Yes. The same principle works for small objects, not only food. Caps, small bottles, packaging elements and cosmetic products can all be released into frame with the right plate size and surface.
How long does the rig last?
Pneumatic cylinders are durable parts. The wear usually happens on the slide plate, brackets or 3D printed elements. Print or prepare a few spare plates and the rig can last for many sessions.
Where to go from here
Once your slide drop rig works, you can build many other air rigs from the same base idea. The next logical step is learning how to choose the right cylinder size for different tabletop setups.
For the bigger picture, start with what tabletop rigging is and how air, water and motion-control rigs fit together.
You can also see more real tabletop rigging examples in the Rig Lab Academy work section.
The course covers this type of rig in more depth, including single-cylinder and dual-cylinder versions, practical mounting choices and selected 3D files where available. The waitlist is open.
A pneumatic slide drop rig is not just a beginner exercise. It is one of the most useful building blocks in tabletop food video. Build it cleanly, test it properly, and it will teach you how many future rigs should work.